My problem is: I cannot control directly the mixing console (loudness, more basses, pan adjustment) as it stands 20 meters away from me. I tried therefor to control the mixing control (in fact: only a single channel on this console) by using a PC (here called frontend or client) standing near to me and an Raspberry 3 (here called backend or server) connected to the mixing console by a short audio cable. Between the PC and the Raspberry 3 commands are exchanged via a 433Mhz wireless connection.
I have written three solutions for the given problem:
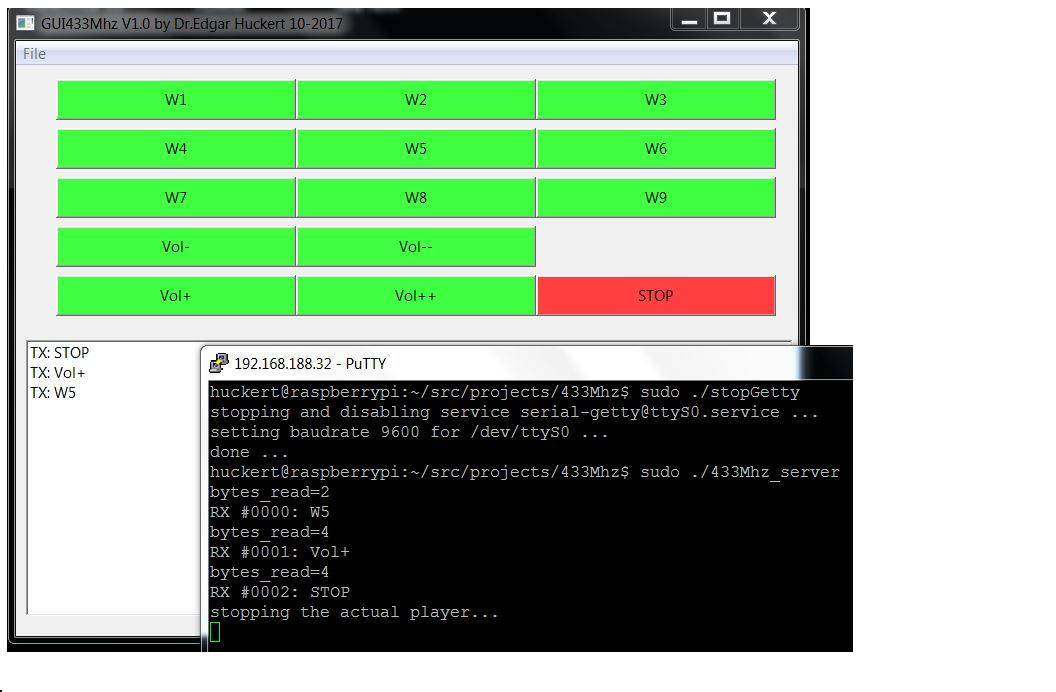
I have written a very simple graphical interface - the GUI client or frontend - for an Intel/Windows based PC or for Linux/GTK based PCs. It was essential for me that this interface was as simple as possible as you have no time to issue complicated commands if you stand on a stage playing rather complicated music (in my case Jazz). The interface therefore only has some simple buttons for manipulating the remote player.
The server or backend is a conventional C program that accepts commands transmitted via the HC-12 modules and controls an audio player program.
The frontend is a PC based client (Windows or Linux/GTK). This is a graphical user interface (GUI) consisting mainly of large buttons enabling the start of songs (actually 9 songs), then control of the loudness (4 buttons) and a STOP button to cancel the actual player process. The GUI code is portable between Windows and Linux/GTK as I use wxWidgets.
The frontend communicates with the backend by sending very simple ASCII based messages. The messages are the texts seen on the buttons. You will see the frontend below under the chapter „The real scenario“. When we mix software and hardware components then the frontend consists of:
The Arduino program is more or less a simple echo program: it just reads bytes from the serial line and forwards them to the HC-12 transmitter. The Arduino is needed as you cannot normally manipulate directly pins on a PC!
It is important that the frontend HC-12 has only the TX-pin connected to the RX pin of the Arduino. The RX pin must not be connected - it is used by the USB/serial driver internally.
The backend (server) is much simpler than the frontend. It consists mainly of a server program receiving messages from the client. After having received a message it starts a WAVE player, stops a player process or controls the loudness of the player. If we mix again hardware and software then the backend consists of:
Note that I don't recommand a Raspberry 2: the audio module is worse that on the Raspberrry 3.
One of the bigger problems in the backend were the STOP commands: I had to manipulate the process list (ps ax on the console) in order to find the actual player processes that were to be killed.
The player used in this backend is my own program playw (the source is included). If you don't like this program you can also use standard ALSA commands like aplay. The player is alway started as a separate background process – it is not tightly coupled with the backend program 433Mhz_server.
I include a hardware architecture diagram describing the hardware modules: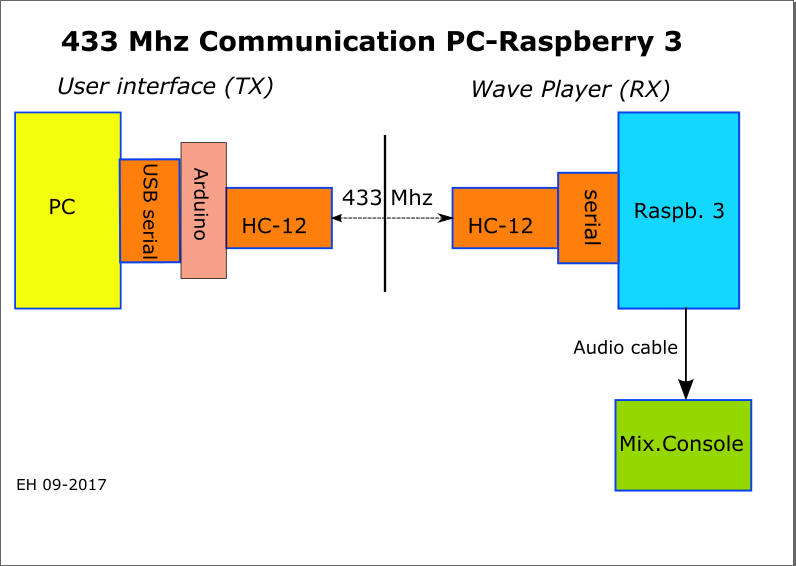
The HCI-12 modules can also be configured via AT-commands to work with other baud rates - I left them in the standard configuration.
On the Rasberry 3 side you should test if a getty process (a login process) is running on /dev/ttyS0.
This getty process can seriously disturb the reception of commands on the Raspberry 3 side. Proceed as follows under Raspian V8.0:
ps ax | grep getty
If getty or agetty is shown in the result then:
sudo systemctl stop serial-getty@ttyS0.service
sudo systemctl disable serial-getty@ttyS0.service
These commands stop and disable the getty or agetty process only for the current session. The processes will reappear on the next boot. I have placed these commands in a short procedure called stopGetty.
The following screen shot shows my communication test scenario: the upper „black“ window shows a Putty screen running minicom on the Raspberry 3, the lower black window shows TeraTerm running on a Windows PC:
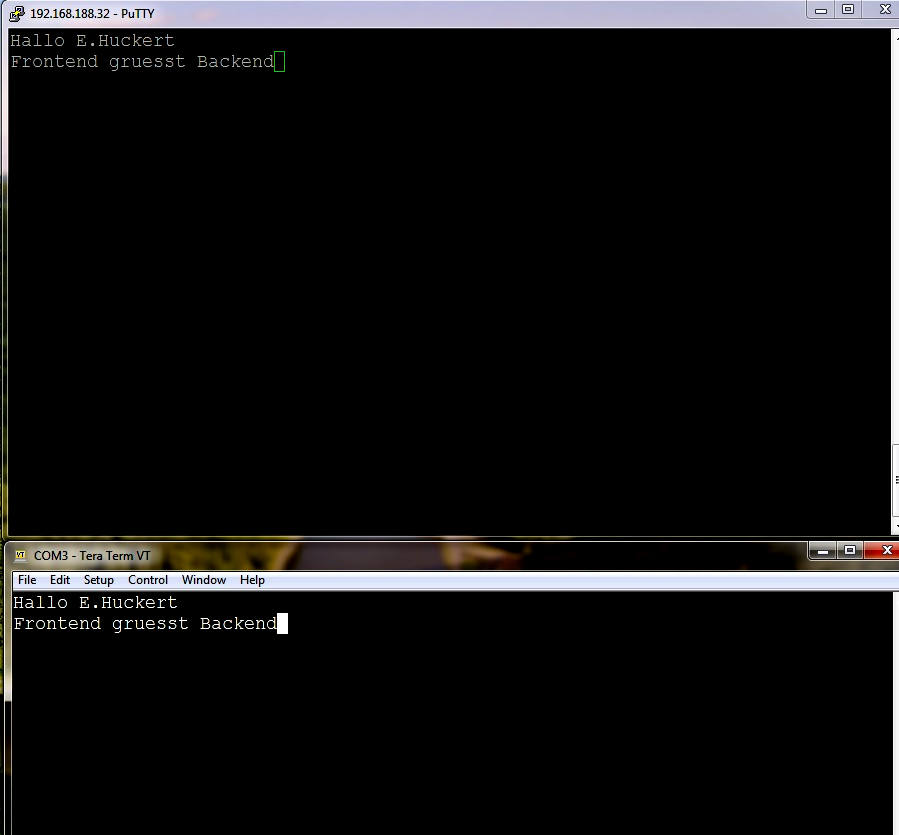
Not much surprise here: the input on the lower window is echoed on the upper window.
On the frontend side (PC) TeraTerm or a similar terminal emulation is still good to send commands. Please be aware that the backend expects commands terminated by LF ('\n'). Be sure that you have configured you terminal emulation accordingly or enter explict linefeeds after each command string. CTL-J will normally do the job.
After having placed some WAVE file in the Wave directory you can enter commands in the terminal emulation of the frontend side. The commands accepted can be something like the following:
The real frontend will do nothing else than issuing these commands.
The backend receives the commands and executes the appropriate actions:
You should start tests on the backend only if the ALSA architecture including the development package on the Raspberry 3 is installed and working. Commands like aplay provide the base for the most basic tests. If aplay produces no sound then the more complicated tests will fail also.
You don't need a WLAN connection nor Putty – the server can run without this. Be sure that to start it on the Raspberry with root rights or change permanently the access rights for the serial line (in my case /dev/ttyS0). The procedure stopGetty that can can see in the first line of the Putty windows disables an eventual agetty process running on this serial line. It also configures the serial line for 9600 Baud, no parity, 1 stop bit.
Do not forget to enter the correct serial device names (Linux) or COM numbers (Windows)in the ini-file 433MhzGUI.ini. Under Linux this should be somethin like „/dev/ttyUSB0“ and under Windows just „3“ oder „20“. While testing I have seen a lot of variation for the Windows COM ports: from COM3 to COM20. If you see the error message "ERROR: cannot open device" then the COM port or the serial device you selected in the ini-file cannot be opened. Check if you see it in the port list of TeraTerm or any other terminal emulation.
A note for the Arduino to be used on the client side: I used an Arduino Nano. On one of my Windows 7 machines I had problems with the driver for the USB-serial port: It seems that the orginal Arduino Nano uses an FTDI chip whereas many clones use other chips like CH340 in my case (I even didn't know that my Arduino was a clone). I could solve the driver problem by installing the driver CH341SER on the Windows PC. Under Linux/GTK I had no special problems with the driver.
A really short Arduino sketch named PlayerFront.ino is in the ZIP file. This sketch just accepts bytes from the USB-serial port and forwards them to the HC-12 module that is wired with the Arduino.
The server program 433Mhz_server must be started manually or at boot time (systemd or inittab) or as a "start once" action in crontab. The player process playw must be found somewhere on a common path.
You have to fill the Wave directory with WAVE files. It is very important for this simple solution to place all WAVE files (or MP3 if you use a different player) in the same directory. Note that the names of the WAVE files correspond to the button names in the GUI. If you want to use more elaborate WAVE file names then you have to introduce an indirection level on the server side (a mapping table) or on the GUI side.
If you change the name of the player command then the STOP logic must also be changed: the backend program inspects the process table in order to find the player process by name.
If you have tested the program 433Mhz_server manually and if everything works fine then you can add entries to file /etc/crontab in order to start the backend at boot time. In my case I added two lines lines at the end of /etc/crontab:Copyright for all images, texts and software on this page: Dr. E. Huckert
If you want to contact me: this is my mail address